
XBMCState – Allows you to run Vera scenes based on Kodi’s video or audio playback status.
KodiRemote - Updates / Replaces XBMCState.
Vera Home Automation – Kodi add-on for a GUI to control Vera from within Kodi (New development starting soon, hopefully!)
Kodi OpenElec / Logitech Harmony / Vera integration – Turns a bog standard Harmony universal remote control in to a remote that can control Z-wave devices and scenes that are in Vera via your Kodi HTPC.
Kodi IP Security CAM Overlay add-on – Allows for IP camera image to pop-up in Kodi, can also be integrated with Vera.
Send pop-up notifications to Kodi from Vera – Send notifications to Kodi via Vera scenes.
My latest article is about the excellent DLNA Media Controller plug-in for Vera, which you can read more about here. With this DLNA plug-in you can then control Kodi playback / transport controls from the Vera web UI. You can also control any other DLNA compliant media box.
Here you can see my Living Room room in the Vera UI5 web interface.

Here is the DLNA device I have configured to connect to my Kodi01 OpenElec HTPC in my living room. You can see there are some basic transport control buttons for controlling Kodi.

And here is another DLNA device instance in Vera for the Kodi02 PC in my bedroom

Another great feature of the DLNA plug-in for Vera is you can also then sent Text-to-Speech (TTS) announcements to Kodi Media Center. which was the main reason why I installed the DLNA plug-in in the first place.
Now I configured all of this a good while ago and may not remember all the steps for the setup, so I don’t think I will be doing a detailed step-by-step guide, however I will describe the basic setup method and post some screen shots of my settings. Also you can read my thread here on the Micasaverde forum where I was talked through the DLNA plug-ins TTS feature.
Install UPnP Event Proxy plug-in for Vera:
The DLNA plug-in relies on this UPnP Event Proxy plug-in which must be installed.
Firstly install the UPnP Event Proxy plug-in for Vera, the easiest way is to install it from the MiOS marketplace via this link here. Login to your MiOS account and select the Vera unit you want to install on to. The app will then be pushed out to your Vera unit.
I don’t recall having to change any settings to the UPnP Event Proxy device in the Vera web UI as it just runs a simple HTTP server on your Vera which listens for UPnP NOTIFY messages and forwards them on to another MiOS plugin.

Install DLNA plug-in for Vera:
Next install the DLNA plug-in for Vera, again install this from the MiOS marketplace via this link here.
Creating DLNA device in Vera:
When installing the DLNA plug-in via the MiOS marketplace your first DLNA device instance in Vera will be automatically created for you. To create more DLNA devices in Vera refer to the “Create Device” instructions on the MiOS marketplace here.
Kodi UPnP settings:
Next you need to check out the UPnP settings in Kodi Media Center, go to Settings –> Services – UPnP. I just enabled the option “Allow control of Kodi via UPnP”

You can create multiple instances of the DLNA device in the Vera web UI, one for each of your Kodi HTPCs for example. So you would also need to enable this setting on every Kodi PC.
Select your media renderer:
You will also have to then link your new DLNA device in Vera to a physical media renderer device aka your Kodi PC. Follow the instructions entitled “Select your media renderer” as seen on the MiOS marketplace webpage here.
DLNA Device tabs:
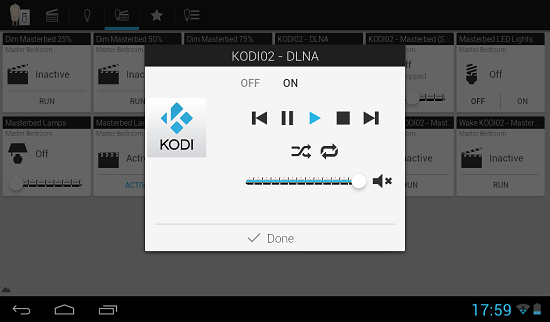
Control Tab – On this tab we can see the playback transport control buttons, you can also see I am currently playing a music track on my Kodi HTPC.

Player Tab – On this tab we see more details about the currently playing media, in this case a music album I am playing in Kodi. The transport control buttons can also be seen and used on this tab.

TTS Tab – On this tab you can manually send TTS announcements.

However you can also add them to your Vera scenes, for example on my Doorbell scene, when the doorbell has been pressed it will send a Google TTS announcement to each Kodi PC around the house that “There is someone at the door”.

Again if you are interested in the TTS side of things I’d recommend you read the thread I started about it on the Miscasaverde forum here as there were a few pit-falls from what I recall.
Settings Tab – On this tab you can see that this particular DLNA device instance is linked to my Kodi01 PC. Which is the HTPC in my living room.

In each room where I have a Kodi PC I have also created a DLNA device instance in Vera for that room / Kodi PC.
Help Tab – Not really sure what this tab is for? It appears to be listing some current information about what media content is playing in Kodi.

Advanced Tab – I do remember making some changes to some of the fields on this tab. For example in the name field this is where you name your DLNA device instance. You need to ensure in the IP and MAC fields you have the correct static IP address of your Kodi PC and also the network cards MAC address.

Device Options Tab – There isn’t any.

Also check out the advanced scene functionality here of the DLNA plug-in to see what else you might be able to do with it.
Summary
As I stated the main reason for me installing the DLNA plug-in was for the Text-to-Speech features and then being able to have the Kodi PCs make announcements sent from Vera scenes.
Having the playback / transport control buttons for each Kodi PC in the Vera web UI is handy now and again. However where I can really see this becoming useful is when Vera mobile apps like Authomation HD for Android start supporting the DLNA plug-in! You would then be able to have playback control over your Kodi PC in your Vera mobile app which would be more useful.
I have asked the question about Authomation HD support this? here.
UPDATE:
I have been informed that the latest beta version of the Automation HD app for Android does have basic support included for the DLNA plug-in. I was also told that the Authomation HD app development is currently on hold.
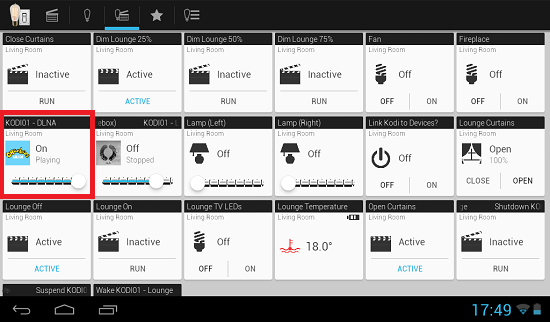
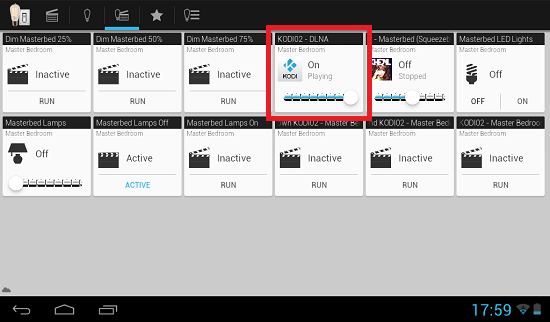
Here are some screen shots of the Authomation HD beta app on an Android tablet and the Kodi / DLNA device.
Music Playback - shows the album cover and I get metadata being displayed, such as track, album and artist name.
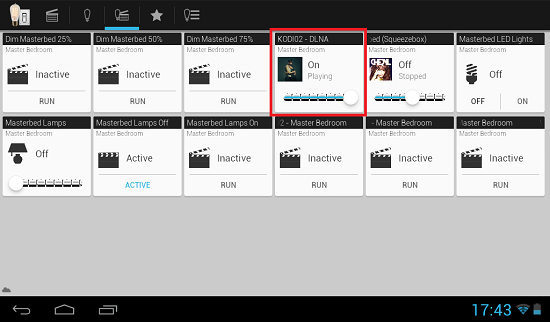

Live TV Playback - shows the channel logo image.

Movie Playback - there seems to be an issue with the DLNA plug-in in Vera not showing any metadata for videos that are played in Kodi, I will have to look in to this further. It seems perfectly fine for music playback however. In the screen shots below I was playing the movie title "300" but only a Kodi logo gets displayed and no metadata information about the movie title is shown.
No comments:
Post a Comment