Recently I discovered there is a newer project called KodiRemote which is based on XBMCState, but expands its functions in Vera and adds basic playback transport controls and navigational buttons, so you can now control Kodi Media Center from the Vera web UI.
For these buttons to work you must have the "Allow control of Kodi via HTTP" option enabled in the Kodi Settings -> Services -> Webserver. Port number should be 8080.
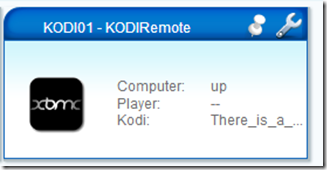

KodiRemote currently works with UI5 I believe and the developer says he is working on UI7 support for Vera. As I am running a VeraLite on UI5 this guide will be based on that version of the Vera Z-wave Home Automation controller. This article Part One, will cover the installation and setup of KodiRemote both on Vera side and in Kodi Media Center.
Part Two will probably cover creating scenes in Vera to work with KodiRemote for auto controlling your lights for example. I may also discuss how to setup a Virtual switch in Vera to specify if Kodi should be linked to Vera or not? Doing this you can turn off the integration between Kodi and Vera when you don’t want it to happen!
The setup for KodiRemote is more difficult than XBMCState as you need to SSH in to your Vera box to upload a file to it but I will demonstrate how I did this, we will also need to discover the root password for the Vera box to be able to do this. You can also see the developers setup instructions on the first page of this thread here. At the time of writing 17/04/2015 all the installation files you will need are also found on this thread and I will be linking to these, please note if you are reading this guide sometime later that these links may have changed which is beyond my control.
OK so lets get started and we will do the hardest part first which is SSH access in to your Vera box. Here are the developers comments about this, which is not allot to go on.
Requirements -
akb-json.lua (in Vera, Place it in /usr/lib/lua/)
1. Discover the root password (The following instructions were taken from this Wiki page here)
So how do we do this? Firstly we need to know the root password of the Vera box, I believe some Vera units have the root password printed on a sticker somewhere on the back, check yours first can you see it? If so write it down and make a note of it and you can skip this section. If not? Then you need to do the following to discover what your password is?
In Vera UI5 go to the Account tab and login to your MiOS account. Now select “Tech Support” it should be disabled, now click the “Enable It” button.

You will then see something like the below screen shot, note I have blacked out my Vera units serial number, you will see your own serial number in these locations.

Look at this section and make a note of the number after you serial number, in this example its 305052
This is a temporary password to give us some SSH access to the Vera box.

Now we need a client program that we can use to SSH in to the Vera box, I use Putty on my Windows 7 workstation.
You can download and install Putty from here.
Open Putty, enter the IP address of your Vera box and ensure you have 22 in the Port field. Also ensure SSH is checked. Then click the Open button.

A black terminal window will then be displayed showing a Login As: prompt.
Enter the username: remote
Now enter the temporary password you discovered previously.
You should then see a screen like this one.

Now type in this command to discover your root password!
nvram show | grep pass
Where you can see the red line, is where your root password will be displayed, write this down and make a note of it.

You can now close the Putty program. Don’t forget to go back in to the Vera web UI and Disable the temporary Tech Support access, by clicking the “Disable It” button.
2. Uploading the akb-json.lua file to your Vera box
Here are the developers further instructions:
You'll have to SSH into your Vera.
perhaps scp will be a much easier.
go to your terminal window (Mac or Linux) and run something like this:
scp /local/path/to/akb-json.lua root@your.vera.ip.address:/usr/lib/lua/
OK so first you need to download the akb-json.lua file to your workstation PC. Go to the forum page here and download the akb-json.lua file from the first post, save it to your desktop or somewhere.
Now I am using my Windows 7 laptop as my workstation PC and I wasn’t sure how to upload the akb-json.lua file to Vera directly using Windows. The developer says use the terminal window on your MAC or Linux PC. I do have an Apple MAC here which is our family computer, so I could have used that machine. However I decided to use one of my Linux PCs, actually I used one of the Kodi OpenElec HTPCs to do this.
I used my Windows 7 PC workstation to connect to the SAMBA shares of the OpenElec PC, to do this I just used the Windows RUN dialog and entered \\192.168.X.X the IP address of my OpenElec PC.

I then copied the akb-json.lua file from my Windows 7 PC’s desktop and pasted it into the Downloads folder on my OpenElec PC.

Next I used Putty to connect to my OpenElec PC via SSH. This time entering the IP address of the OpenElec HTPC.

The default username and password for OpenElec are root and openelec
You will then see a terminal window like this one

Now type: cd downloads and press Enter on the keyboard

Now run this command to upload the akb-json.lua file which is located in the downloads folder on your OpenElec PC to the /usr/lib/lua/ folder on your Vera box.
scp akb-json.lua root@your.vera.ip.address/usr/lib/lua/
So it should be something like
scp akb-json.lua root@192.168.1.10/usr/lib/lua/
If 192.168.1.10 was the IP address of your Vera box for example.
You will then be prompted for the Vera units root password, which you wrote down earlier in the previous step.
If it works and the akb-json.lua file is copied up to the Vera unit it will look like the below screen shot and say 100%.

Success! you have now completed the difficult part of this guide, the rest should be much easier going, you can now exit the Putty terminal program.
Note:- I am no Linux guru and there are probably several other easier ways to get the akb-json.lua file uploaded to your Vera box, but this is how I did it.
3. Install the KodiRemote plug-in on to your Vera unit.
The KodiRemote plug-in for Vera can be found on the MiOS Marketplace here. Go to this webpage, ensure you are logged in with your MiOS account and select your Vera unit, then select Latest Release

And then select the Install button

The KodiRemote plug-in will then be pushed out to your Vera unit and installed.
When it has been installed if you go to the APPS tab in the Vera web UI you should see it listed as being installed etc.
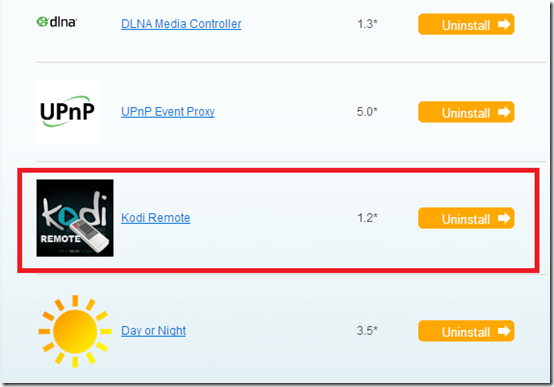
You also need to install the Day or Night plug-in for Vera as this is also a requirement. Follow the same install procedure for the Day or Night plug-in from the MiOS Marketplace here if you don’t already have it installed?

4. Install the KodiRemote add-on for Kodi Media Center (or XBMC).
At the time of writing 17/04/2015 there are two download links on the Micasaverde forum page. One for Kodi Helix and one for presumably older versions of XBMC. Again these download links may change over time and be updated on the forum post, so it will be up to you to download and install the correct add-on zip files.
Kodi Helix add-on can be currently found on this post here named script.service.micasaverde.zip
And for other versions of XBMC the add-on named micasaverde.addon.zip can be found here. (I’ve not personally tested this one).
As I am using OpenElec 5.0.8 Kodi version 14.2 I downloaded the script.service.micasaverde.zip file to my Windows 7 PC workstation.
Again using the Windows RUN dialog I connected to the SAMBA shares on my OpenElec PC and copied the script.service.micasaverde.zip file in to the Downloads folder there.
Next in Kodi you need to install the add-on.
Note:- If you already have the XBMCState add-on which is named “Micasaverde XBMC Event” installed in Kodi / XBMC, you should first uninstall this add-on. To do this go to Kodi System Settings – Addons – Enabled Addons – Services find the “Micasaverde XBMC Event” add-on and uninstall it.
To install the new KodiRemote add-on which is named “Micasaverde Kodi Event” you need to do the following:
Navigate to System Settings – Addons – Install from ZIP file
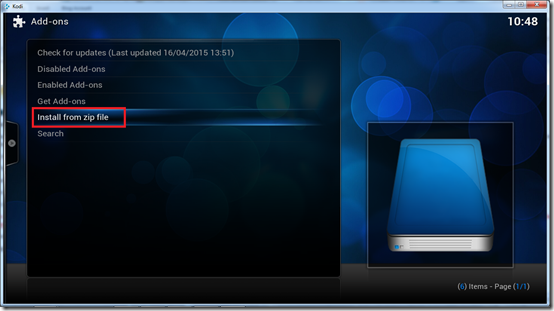
Now browse to your Downloads folder on the OpenElec HTPC or to where ever you saved the .zip file, where your Kodi PC can access that file location.
In my case I need to select the HOME FOLDER
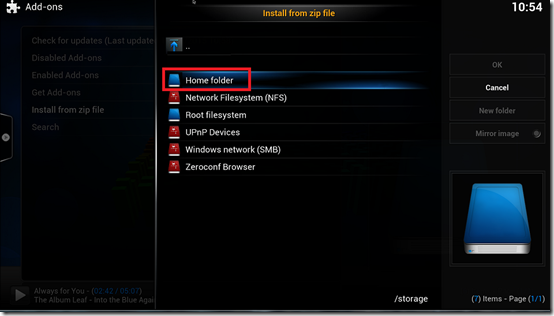
Then I selected the Downloads folder
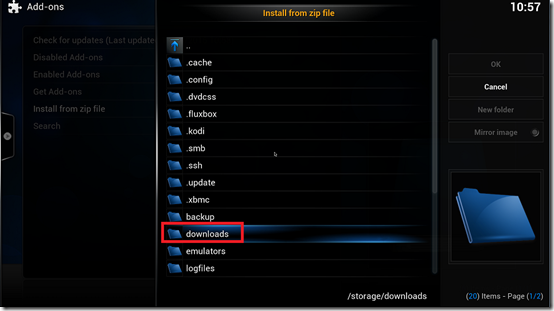
And finally selected the script.service.micasaverde.zip file that I placed into this downloads folder.
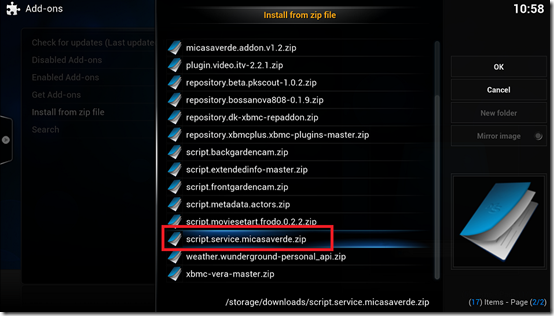
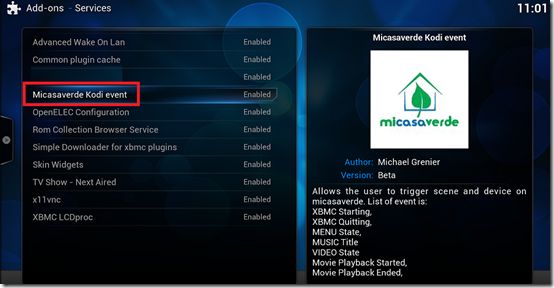
Once the add-on is installed in Kodi you can find it in the following location:
System Settings – Addons – Enabled Addons – Services and its called “Micasaverde Kodi Event”
Now right click the “Micasaverde Kodi Event” add-on entry and select Configure.
Enter the IP address of your Vera unit and select OK. Now reboot your Kodi PC.
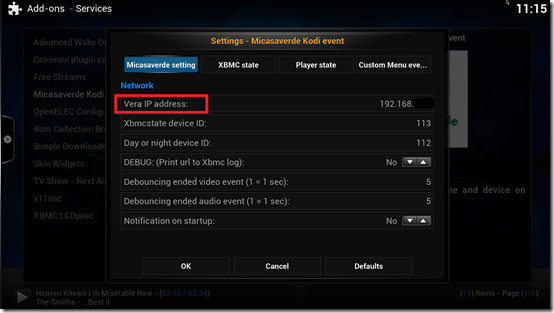
We can ignore the rest of the settings in here for now, as we now need to configure your first KodiRemote device instance in Vera, once we have done this we will come back to the settings in the Kodi add-on and complete the setup.
Note:- if you previously had the “Micasaverde XBMC Event” add-on installed for XBMCState, then you existing settings will still be present, some will need to be changed later.
5. Create and configure the KodiRemote Device instances in Vera
After installing the KodiRemote plug-in for Vera via the MiOS Marketplace, if you look in your Vera web UI, you should see that the first KodiRemote device instance has been automatically created.
In Vera UI5 go to the Devices tab and in the No Room section you should see the KodiRemote device.
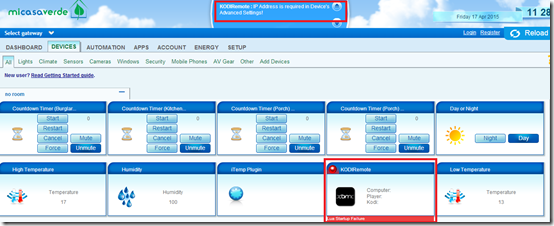
This now needs to be configured to connect to the Kodi PC you just installed the “Micasaverde Kodi Event” add-on onto.
Click the Spanner icon on the KodiRemote device, go the advanced tab and in the IP field enter the static LAN IP address of your Kodi PC.

Note:- On my setup I also entered the real MAC address of the network adapter card in my Kodi PC in to the MAC field. I separated with colons : This may be optional.
Now you need to make a note of the Device ID in the above screen shot it is #116, you will need to enter this ID number in the “Micasaverde Kodi Event” add-on settings in Kodi later.
Give the KodiRemote device instance in Vera a suitable name. I have four Kodi HTPCs in my house and I named them KODI01 / KODI02 etc so for my Living Room HTPC I named the KodiRemote device instance “KODI01 - KODIRemote”
Here is my Living Room KodiRemote device instance, note I also assigned it to the actual room in the house where this HTPC is located.

Once you have configured this save and reload Vera.
Next you need to make a note of the Day or Night plug-ins device ID in Vera. Click the spanner icon and go to the advanced tab and write down the device ID number for the Day or Night plug-in.
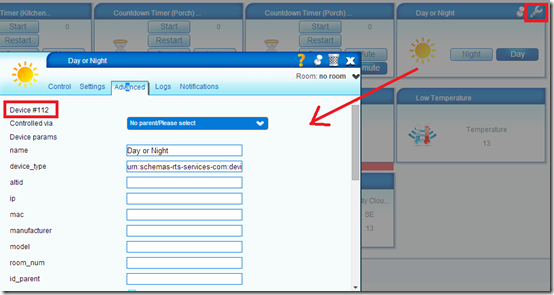
At the end of this section you should have configured the first KodiRemote device instance with the IP address of your Kodi PC, given it a suitable name and assigned it to the correct room. You should have also noted down the KodiRemote device ID number and the device ID number for the Day or Night plug-in. We can now go back to Kodi and finish the configuration in there.
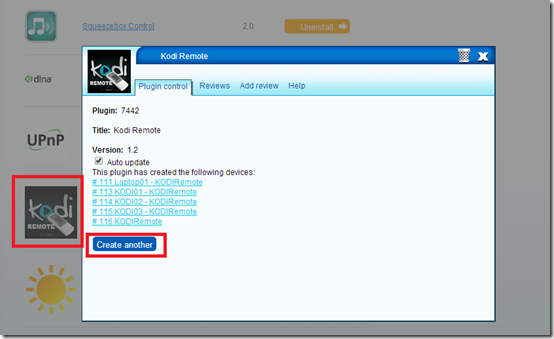
As I have four Kodi HTPCs I repeated this process and created a KodiRemote Device instance for each of the four Kodi PCs. To create further KodiRemote device instances, go to the APPS tab in Vera and select the KodiRemote plug-in and select the “Create Another” button.
6. Configuring the “Micasaverde Kodi Event” add-on settings in Kodi
System Settings – Addons – Enabled Addons – Services and its called “Micasaverde Kodi Event”
Now right click the “Micasaverde Kodi Event” add-on entry and select Configure.
Micasaverde Setting:
You should have already entered your Vera units IP address, next in the XBMCState device ID setting, enter the KodiRemote device instance device ID number you wrote down in step 5.
And also enter the Day or Night plug-in device ID as well.
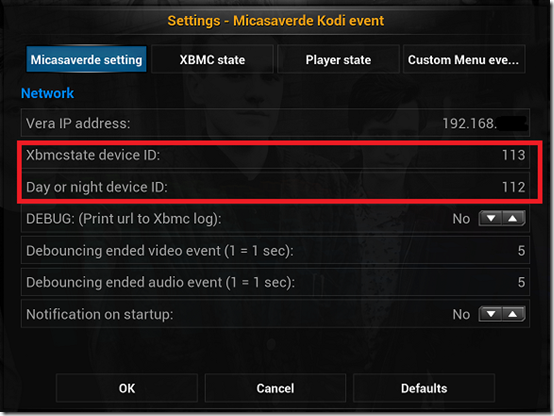
I also recommend you enter 5 in the “Debouncing ended video event” and” Debouncing ended audio event”.
XBMC State:
I’ve never actually used any of the features in this section of the settings, but you can have the “Micasaverde Kodi Event” add-on send status updates to Vera about which areas of the Kodi GUI are being accessed.
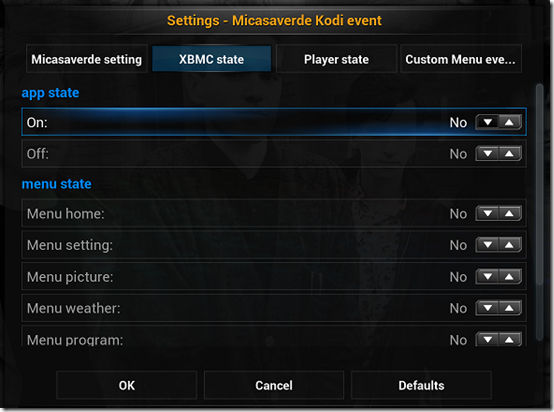
For example I just changed the “Menu Picture” option to YES. And if I then navigate in Kodi to the Pictures area of the GUI, then in Vera on the KodiRemote device instance I see the status has changed to “picture”
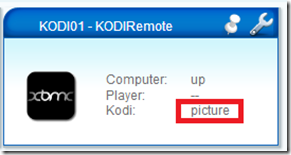
So presumably you could then use this as a trigger event in Vera to run a scene.
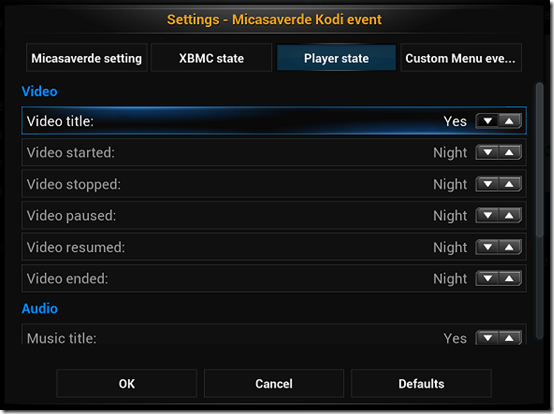
Player State:
OK Player State is the settings area we are really interested in!
I have “Video Title” set to Yes, this will send the title of the currently playing video to the KodiRemote device instance in Vera.
I have changed all the various video playback statuses to Night. This means that my scenes in Vera that control the automatic dimming and brightening of my living room lights will only happen if it is night time. More about these Vera scenes and setup will be covered in Part Two.
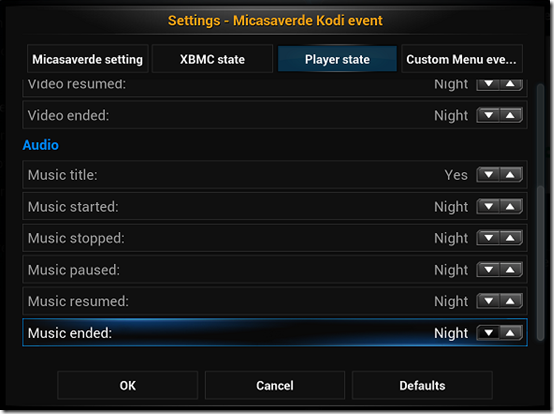
And again the same for the Audio (music) section I have the “Music Title” set to Yes and all the various playback states for music are set as Night.
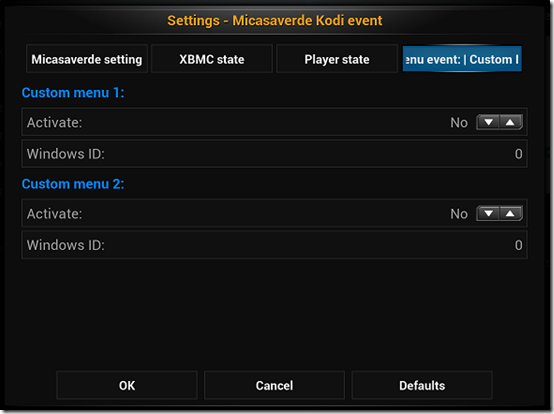
Custom Menu Event:
I’ve never used this section of the settings, my guess would be that you can specify two additional Kodi Window IDs and have the status of those sent to Vera when you access those particular areas of Kodi.
For a list of Kodi Window IDs see the Wiki here.
After configuring all of these settings you may then want to reboot your Kodi PC.
7. Test your setup
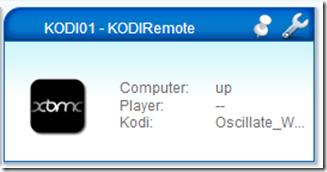
That’s it for the configuration and setup in Part One. I recommend you now try playing some media content in Kodi such as a movie and a music album and then look in Vera at the KodiRemote Device instance, that is says UP and that the title of what media content you are playing can also be seen in the KodiRemote device in Vera. You can also try out the new playback transport control buttons for controlling Kodi from the Vera web UI.

Summary
In Part Two I will be looking at how to create Vera scenes and use triggers from the “Micasaverde Kodi Event” add-on and the various playback states of Kodi, for example to automatically dim and brighten Z-wave lamps based on Kodi’s playback status and if it is night time.
I am very happy to see that a new developer has picked up XBMCState and created KodiRemote based off it and hopefully we will see some new features in the future and support for Vera UI7.
As a final note- if you were previously using XBMCState, once you have created all your new KodiRemote device instances in Vera and connected them to each Kodi PC in the house, you can then go ahead and delete the old XBMCState device instances from Vera and then also uninstall the XBMCState plug-in for Vera, which is what I have done. You will then need to update your Vera scenes and triggers that were previously using XBMCState with the KodiRemote device instance(s). As I said I will cover this in Part Two coming soon.
Part Two Here


No comments:
Post a Comment