Google Search

Custom Search

Powered by...

Find us on Facebook

Friday 31 October 2014

Do you use Micasaverde Vera? Are you an XBMC developer? We need your help!

As you maybe aware there was an XBMC (Kodi) add-on for Vera at one point in the past. The original developer has no plans for further developing this add-on. The original add-on can be seen here. I’ve started a related thread on the Micasaverde forum here.

I am not a programmer and don't have the required skills, however I have made three changes to the add-on and now its working again somewhat.

1. Fixed the dependencies not met error so the add-on can now be installed in XBMC Gotham V13.X

2. I removed a line of code to fix a bug? Where none active scenes could not be run in the add-on. The original issue was described here.

What I did was I just removed one line of code from a file called scene.py located in \xbmc-vera-master\resources\lib\vera

I removed this line:    if scene['active']:

I am now able to run non active scenes OK.

3. I've managed to fix the icons! For some reason when you download this add-on from GitHub on the Internet the icons are corrupted in certain folders. I managed to find working icons in one folder and I then copied these files to another folder where the icons were corrupted. The result is I can now see the icons in XBMC!

You can download my modified XBMC add-on ZIP file from my Dropbox here.

As a result of these changes the add-on is kind of working now, however I have the following issues:

Issue 1: 19 items maximum in the list view.

I have 20 Scenes and 11 Devices in my room called "Living Room" however in the XBMC add-on in this room I can only see 19 scenes.

I also have another room called "Harrison Home" I have 21 scenes and 12 devices, again in the XBMC add-on for this room I can only see 19 scenes listed.

Seems to be some kind of limitation on the number of scenes and devices that get displayed, more details about this issue here with a comment from the original developer.

image

Issue 2: The status feedback seems a bit hit or miss, for example if I open the add-on and turn on a light with it, the status of that device is not refreshed in the XBMC add-on UI. However if I press the “Force Refresh” button at the top, then the lights status is updated and the light bulb icon then changes to ON etc. Subsequent device changes (for that room only) are then detected OK.

However if I go in to another room and turn on a different light its status is not changed again until I manually press the “Force Refresh” button in the add-on.

Feature Request:

In order for the add-on to actually be useful, we would need a way to be able to hide certain devices and scenes from the list view. For example background scenes that do automation tasks like schedules, I don’t need to ever see these or run them myself, so would want to be able to hide them.

Looking for a new developer

Are there any XBMC developers who also use the Micasaverde Vera home automation system? I would love to see someone with the skills to take on this project and further develop it! Fingers crossed!
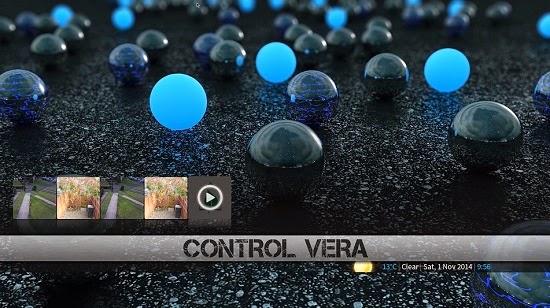
Some of my screen shots from Gotham V13.2.

I created a "My Home" menu and added the "Vera Home Automation" add-on to the menu.


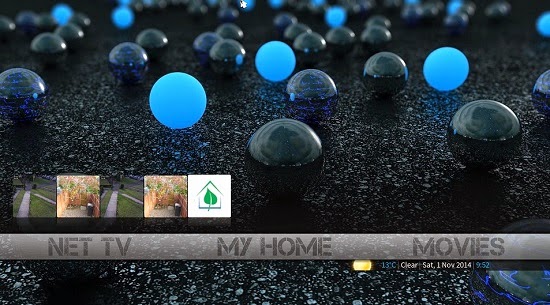
I also renamed the add-on to simply "Control Vera".


imageimage

image

image

image

image

Thursday 30 October 2014

Budget Z-wave Curtain tracks with Vera / Dooya / Fibaro – Part 5

Part one here, Part two here, Part three here, Part four here.

In Part five I will  cover the Vera setup and calibration of the Fibaro Blind Control module and remote control options.

Vera Setup

Once I had connected the Fibaro Blind Control insert module into the mains electric adding the device to the Z-wave network with Vera was very easy. I simply put my VeraLite in to battery mode and carried it next to where the Fibaro module had been installed. I then pressed the + button on the VeraLite and then triple clicked the B button on the Fibaro module, the two detected each other and the Fibaro module was added to Vera as a new device, as simple as that!

B Button on the module
image

I renamed the device and assigned it to my living room

image

image

If you click the Spanner icon on the device it the opens up like this

Control Tab

image

Settings Tab

image

Device Options Tab

In here I added two parameters.

Parameter 10 = 1
Parameter 14 = 0

image

Parameter Number 10: Roller Shutter Operating Mode

image

Parameter Number 14: Switch Type

image

The user manual for the Fibaro Blind Control module can be seen here.

Calibrating

“It may be necessary to calibrate the module, when it's not working properly. The Calibration is a process during which a Roller Shutter learns the position of the limit switches and a motor characteristic. The procedure consists of an automatic, full movement between the limit switches (up, down, and up again). There are different procedures of calibrating a Fibaro Roller Shutter.”

According to the user manual there are various ways to calibrate the blind control module, through Z-wave network, through switch keys, through the B button on the module.

I used this method:

Calibration through the Z-Wave network
  1. Make sure the module is connected to the power supply.
  2. Include the module into the Z-Wave network according to the inclusion procedure.
  3. Set the parameter 29 value to 1.
  4. Roller Shutter performs the calibration process, completing full cycle - up, down and up again.
  5. The parameter 29 value will be automatically set to 0.
  6. Using an interface test whether the positioning works correctly.
image

Until I had done the calibration routine the percentage slider in Vera was not working correctly. After calibration I was able to select say 50% and the curtain rail would move correctly to that position.

You may see a user configuration error in Vera whilst saving after entering the parameter 29, but don’t worry about that, as long as the curtain motor / rail moves and does the calibration routine. See here for more details.

Here you can see when the curtain motor is in operation its using 56 Watts.

image

100% = Open

image

0% = Closed

image

50%

image

Controlling the curtains from other devices

Logitech Harmony Remote Control

Using this method I previously described here, I have also programmed my Logitech Harmony universal remote control with two new buttons, Open Curtains and Close Curtains.
This functionality is integrated in to Kodi (XBMC) OpenElec, so when I am using my HTPC, I can now also use the remote control that is in my hand to control the curtains, now that is cool!

DSCN1785

Android Tablet / Phone – Authomation HD app for Vera

Authomation HD is pretty much the best app for controlling your Vera Home Automation gateway and the Z-wave devices around your home.
Below are a couple of screen shots from our Samsung Galaxy Tablet showing the new curtain device.

image

image

If your an Apple fanboy or girl, I’d recommend the VeraMate app for iOS devices.


Aeotec Minimote Z-wave remote control

I have several Minimote’s around the house, and I programmed button 4 on the one in the living room to run a curtain open / close toggle scene in Vera. By using a toggle I could use only one button on the Minimote to either open or close the curtains.


Integration with Kodi Media Center (Formally XBMC)

Using the XBMCState  add-on which I previously wrote about here, I’ve created scenes in Vera so that if it is dark outside? And if the curtains are still open? When I start to play a movie (any video) in Kodi the curtains are automatically closed and my room lamps automatically dim down to 25%.

image

VIDEO:


Please leave your comments and feedback and don’t forget if you place an order with Friend Group for the motors / curtains rails, to mention to them you were referred by ‘'The Media Center Blog” big thanks!

Budget Z-wave Curtain tracks with Vera / Dooya / Fibaro – Part 4

Part one here, Part two here, Part three here.

In Part four I am continuing with the wiring installation, installing the wall switch and hiding the cable that goes to the curtain motor in the wall.

Wall Switch

So I measured the height of the existing light switches in the room, so my new switch would be at the same level, I placed the back box against the wall ensuring it was level with a small spirit level and drew round it with a pencil. I then used a small thin flat screw driver and a hammer to knock out holes in the plasterboard along the pencil line.

DSCN1792

New hole knocked out

DSCN1794

There was a wooden stud in the wall and I needed to create another small hole lower down in order to be able to get the cable round this piece of wood.
I put my tape measure down in the cut out and worked out roughly where the wood was inside the wall and then marked out this position on the exterior of the wall.

DSCN1795

I then used the screw driver and hammer again to start the hole.

DSCN1797

Once the hole was big enough and I used my electricians fish tape tool which is basically a wire on a reel, to fish down the wall to the bottom.

DSCN1798

DSCN1802

This is that original cut out in the wall at the bottom near the skirting board, where I put in the Fibaro module, you can see I was able to grab the end of the fish tape.

DSCN1801

I then turned off the electric supply in the house and disconnected the new wall switch from the cable, that I had been testing earlier. I then connected the end of the wire to the fish tape with insulation tape.

DSCN1803

I then pulled the fish tape back up through the wall whilst feeding in the cable in from the bottom, until it popped out of the hole in the middle of the wall.

DSCN1804

I then disconnected the fish tape from the cable and using my hands just fed the cable back in to the top of hole in the middle of the wall and then up further to the cut out in the wall for the switch.

DSCN1805

I then knocked out a hole in the plastic of the dry lining back box at the bottom of it and fed the cable in to the box and then push the box in to the plasterboard wall, clipping it in place.


I then re-connected the switch again to the cable.


And then screwed the switch in to place in the back box.

DSCN1810


I then used some bits of mini trucking I had laying around and cut off some pieces of plastic with my hack-saw to cover the cable in the middle of the wall. I did this to give the cable some protection and to also pack out the hole some more, so I wouldn’t have to use loads of filler, plus it gives the filler something to sit up against.

DSCN1811


Curtain Motor Cable

Next job was to hide the cable going to the curtain motor. So I made another small hole towards the top of the wall in the corner where the curtain motor is location. I then made a bigger hole in the middle of the wall again in order to get the cable round the wooden stud in  the wall.

Fishing the tape from the top hole to the middle hole was tricky and took a bit of time and patience.

DSCN1812


As the cable connected to the motor is only 1.5 metres long, I had to buy some more 4-core electrical flex cable off eBay to extend it.

Using the fish tape I pulled up the cable out of the top hole, I then joined the two cables together and I then continued to push and feed the other end of the cable down in to the wall towards the bottom and to the cut out where the double wall socket is near the skirting board.

DSCN1814


Here you can see the cable coming out at the top of the wall for the motor and the other end of the cable I re-connected to the junction box at the bottom of the wall.

DSCN1815


Here you can see the motor cable looped around the wooden stud in the middle of the wall. The hole was probably a couple of inches in length.

DSCN1816


Again I just used some bits of plastic to cover the cable and fill out the hole a bit ready for the filler to go in.

DSCN1819


Here you can see the motor and the cable coming out of the wall and the small hole now filled in.

DSCN1830


First application of the filler. I need to leave this to dry and fill over again and then sand down and paint.
But you can see what the finished result is going to look like. No cable trailing down the wall from the motor.

DSCN1826


Socket back in place.


Once the curtain is wrapped around the motor again you won’t even see it.

DSCN1828


That’s it for part four, in part five I will cover the Home Automation controller setup (Vera) and various remote control options.

I may also do a video of the curtains in action, after my additional curtain rail runners / hoops arrive from the supplier and the curtains are gathered correctly.

Part five here.