UPDATE 1: There appears to be a problem playing back some MKV movies using the LAV filter in version 3.3.9 of the Shark Codec Pack, I have started a thread here. This was not the case in the last version of the Shark Codec Pack I was using which was version 3.1.6. In this guide I recommend you use Haali Splitter on the MKV tab instead of using LAV for now. You can see my working version 3.1.6 LAV setup here.
For connection from your Windows Media Center PC to an Audio Visual Receiver (AVR) 5.1 surround sound pass-through. Either using a HDMI or Optical S/PDIF cable for audio.

This guide is based on Shark Codec Pack version 3.3.9. For x64 Windows 7 OS, ensure you download and install the 32bit version first and then download and install the 64bit components. What’s new since last time I wrote one of these Shark 007 guides is that we are now moving away from FFDSHOW and using the newer LAV Filters for most things. For reference I am using an Intel DH67CFB3 ITX motherboard with the on-chip Intel CPU/GPU. You may need to change some settings specific to your video card manufacturer ATI / Nvidia etc in their driver / graphics properties?
Download both setup files, to install them right click and Run as Administrator (It is recommended you leave Windows UAC turned on)

Run through the setup wizard, unselect Weatherbug if you don’t want to install that as well. Select the Complete installation option.

Once the installation is finished you need to do the same and install the x64 bit components (If your using Windows 64 bit OS). Run through the setup wizard.

When you install Shark 007 it installs a couple of things without asking you, so now go to control panel. Add/Remove programs and remove if you don’t want them the Bing and Ask toolbars. (Please don’t discuss this in my comments below, go do that elsewhere).
You should now have two new entries on your Windows start menu. “Settings Application x64” is used to configure codec settings for 64bit players such as Windows Media Center. “Settings Application” is used to configure codec settings for 32bit players such as Windows Media Player 12.
You should ALWAYS right click these shortcuts from the start menu and select Run as Administrator.

As this guide is for Windows Media Center I will be covering the 64bit settings, however the 32bit settings can be configured virtually the same way.
CONFIG Tab:

By default on 64 bit Windows 7, the default Windows Media Player is the 32 bit version, there is also a 64 bit version of WMP12, Shark recommends sticking with the 32bit version of WMP12 and not changing the default to be the 64 bit version. The Windows Media Center by default is 64 bit ! The x86 version of the shark codec pack is used to configure 32 bit players such as the default WMP12. And you use the x64 bit version of the shark codec pack for configuring 64 bit players such as Windows Media Center.
I normally change Subtitle Control to “No Subtitles” as I don’t have many files with subs, however if you require subtitles then leave it on the default setting of DirectVobSub. (Note this does not affect subtitles in DVD and Blu-ray discs only for video files).
I am going to make a slight variation in the FFDShow audio settings, I have some .MOV files which were originally downloaded from the Apple iTunes store. They were then DRM stripped, these files contain AAC audio tracks and the only way I could get them to play in Windows Media Center was to change the following setting in the FFDShow Audio Decoder configuration, you probably won’t need to do this.

I am changing the audio decoder for AAC audio from libavcodec to libfaad2

AUDIO Tab:
On the screen shot below you can see the default settings for the Audio tab which we will use. Now if you have followed any of my previous guides on Shark 007 setup you will know that I normally select use pass-through (Digital Audio) here for FFDShow S/PDIF pass-through. However in this version we are going to do something different and leave FFDShow pass-through turned off. Instead we are going to use the newer LAV audio.

Click the setup LAV Audio button above and then you will see the dialog below.
Note:- You don’t need to do this if you are not connecting your Media Center PC to an AVR and if you are just using the analogue audio 3.5mm jack output on the back of the PC to a stereo amplifier.

For setup with your AVR and to have the AVR do the audio decoding rather than the PC doing it, so the PC just passes through the audio to the AVR to decode the audio signals then check the following boxes.

AVI Tab:
The default is now back to use the Microsoft splitter. I was using Shark 007 codec pack version 3.1.6 previously and in that version the default option was set to use the LAV Splitter. I have only just upgraded from version 3.1.6 to version 3.3.9 for the purposes of this guide.

I didn’t have any issues playing AVI files in Windows Media Center with the LAV splitter so I am going to change this setting to use the LAV’s splitter again.

H.264 Tab:
I am going to stick with the default settings on the H.264 tab.

MKV Tab:
Again in this version 3.3.9 the default setting for MKV has reverted back to using the Haali Splitter. In version 3.1.6 the default was to use the new LAV splitter and MKV’s played well with LAV. I’ve just tested it and there seems to be a problem using the LAV splitter with MKV files in this version 3.3.9. So for now I suggest you leave it set to use the Haali splitter. Something must have changed from version 3.1.6 to break this.

I am also going to uncheck Disable DIVX Media Foundation splitter, as I have an XBOX 360 Media Center Extender and the DIVX Media Foundation is required to playback MKV files on the XBOX 360 Media Center Extender. If you don’t have an XBOX 360 Media Center Extender you can leave Disable DIVX Media Foundation checked.
MOV / OGG Tab:
Below you can see the default settings for the MOV / OGG tab.

Because I have a specific requirement to play these Apple iTunes DRM stripped MOV files I have, I am going to change a setting here. You can probably stick with the default settings shown above.

MPG / MP4 Tab:
Below you can see the default settings for the MPG / MP4 tab. I am going to stick with these default settings.

SWAP Tab:
Below you can see the default settings on the SWAP tab.

Because I have some AVI files with 5.1 audio sound tracks in them, I am going to change one setting on the SWAP tab. I am going to tick Disable Windows DMO video codec. I find if I do not disable this setting when I play AVI files in Windows Media Center that have 5.1 audio they don’t play properly, the audio becomes out of sync and the video can get stuck for a moment and then speed up to catch up.
If I disable Windows DMO video codec all these problems go away and the AVI files with 5.1 audio play well in Windows Media Center. There is one drawback however, if you check this setting you will break online trailer playback in the My Movies Trailer Library. The trailers will not play at all and you will see a video error in Media Center. I’ve never been able to figure that out.

My configuration is now completed for the 64 bit Settings Application. I would recommend you now go back over each tab again and double check the settings are still correct as sometimes the application can change settings in the background without you knowing, once 100% happy go to the Misc tab and click the button to Save all settings.
32 bit Settings Application
Once I have finished my configuration in the 64 Settings Application, I then open the 32 bit Settings Application (Run as Administrator) and I set the same settings again in the 32 bit version.

Uninstalling Shark 007
We were always told by Shark to use the UNINSTALL button on the Help tab to remove his codec pack and not to use Add/Remove programs in Control Panel.
However I see in the codec pack change log which you can read here, that the later versions of the codec pack now support removal from Control Panel. I would probably still advise you use the UNISTALL button on the Help tab to be on the safe side. You should always remove the 64 bit Components first and then the 32 bit version. You must fully uninstall before you attempt to install any newer version of the codec pack.
When installing always install the 32 bit then the 64 bit version.

Testing your Configuration
To do this I have a collection of sample video files in various file formats and containers. I also have about 5 or 6 movies in different formats which I always use to test with. So basically I have a set of known video files that I know exactly how they should behave. I don’t currently have a new AVR that supports HDMI or the new Blu-ray HD audio formats. Dolby Digital True-HD and DTS-HD Master Audio, however trust me they will work. If anyone wants to donate to me a new AVR then please feel free!
Windows Media Center Speaker Setup
You should always first ensure you have run through the Windows Media Center speaker setup and selected 5.1. To do this go to the Tasks menu strip in WMC select Settings and then select General –> Windows Media Center Setup –> Setup your Speakers

Select your connection type probably HDMI or in my case TOSLINK

Select 5.1 Surround Sound and run through the rest of the wizard and finish.

Obviously if you are not configuring your Media Center PC for 5.1 and are just using a stereo amp and the analogue audio output of the PC then select 2 speakers.
DVD Playback with the Windows Media Center Player
First test some DVD movies with Dolby Digital and DTS audio. For this I use Indiana Jones and the Raiders of the Lost Ark (Dolby Digital) and Carlitos Way (DTS) but you have to select DTS from the Languages option on the DVD menu. If LAV audio pass-through is working then the AVR should decode the audio signal. This means on the front of the AVR it should light up with Dolby Digital or DTS and should not say PCM.
Blu-ray Playback with the Arcsoft TotalMedia Theatre 5 WMC add-in
There are a few settings you need to check out first in the Arcsoft TMT5 WMC add-in settings.

Under Audio
Speaker Output: Should be either HDMI or in my case S/PDIF
Mixing Mode: Should be set to Using original primary audio

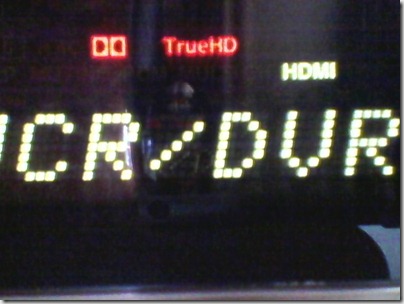
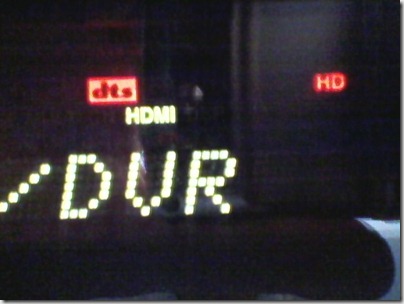
Test playback of two Blu-ray discs one that has Dolby Digital TrueHD and one that has DTS-HD Master Audio sound tracks. If you’ve got it right you should see the AVR light up as shown below.
Dolby Digital TrueHD on AVR display
DTS-HD on AVR display
Video File Playback
Now obviously that is a massive amount of different video file format types and containers out there. I setup my systems primarily to be able to play AVI and MKV’s within Windows Media Center. However I am able to play other formats as well, these are the video types I have tested.
- DIVX-HD (AVI)
- DIVX (AVI)
- DVR-MS (Windows Vista Recorded TV)
- FLV (Flash)
- MKV (Use Haali Splitter not LAV in V3.3.9)
- MOV
- MPEG2
- M2TS (I’ve got two M2TS sample clips one plays one doesn’t)
- VOB (DVD)
- WMV
- WMV-HD
- WTV (Windows 7 Recorded TV)
- XVID (AVI)
- M4V
- MP4
You can use Shark 007 to examine in more detail a particular video file. To do this go to the Misc tab and click the Analyse a media file button.

Browse to the video file and click Open, you will see the information for the video file in Notepad.
Below I used the Analyse media file feature on one of my .MOV movie files.
General
Complete name : \9 (2009).mov
Format : MPEG-4
Format profile : QuickTime
Codec ID : qt
File size : 932 MiB
Duration : 1h 19mn
Overall bit rate : 1 644 Kbps
Movie name : 9 (2009)
Performer : Shane Acker
Genre : Kids & Family
Recorded date : UTC 2009-12-29 08:00:00
Encoded date : UTC 2011-01-21 11:56:05
Tagged date : UTC 2011-01-21 12:21:37
Writing library : Apple QuickTime
Copyright : © 2009 Focus Features. All Rights Reserved.
Cover : Yes
desc : From visionary filmmakers Tim Burton (The Nightmare Before Christmas) and Timur Bekmambetov (Wanted) and Academy Award-nominated director Shane Acker comes this visually stunning and original epic adventure. In the final days of humanity, a dedicated scie
stik : 9
Video
ID : 2
Format : AVC
Format/Info : Advanced Video Codec
Format profile : Main@L3.0
Format settings, CABAC : No
Format settings, ReFrames : 2 frames
Format settings, GOP : M=2, N=24
Codec ID : avc1
Codec ID/Info : Advanced Video Coding
Duration : 1h 19mn
Duration_LastFrame : -8ms
Bit rate mode : Variable
Bit rate : 1 511 Kbps
Width : 640 pixels
Height : 460 pixels
Display aspect ratio : 1.855
Original display aspect ratio : 1.391
Frame rate mode : Constant
Frame rate : 23.976 fps
Color space : YUV
Chroma subsampling : 4:2:0
Bit depth : 8 bits
Scan type : Progressive
Bits/(Pixel*Frame) : 0.214
Stream size : 857 MiB (92%)
Language : English
Encoded date : UTC 2011-01-21 11:56:05
Tagged date : UTC 2011-01-21 12:21:37
Color primaries : BT.601-6 525, BT.1358 525, BT.1700 NTSC, SMPTE 170M
Transfer characteristics : BT.709-5, BT.1361
Matrix coefficients : BT.601-6 525, BT.1358 525, BT.1700 NTSC, SMPTE 170M
Audio
ID : 1
Format : AAC
Format/Info : Advanced Audio Codec
Format profile : LC
Duration : 1h 19mn
Bit rate mode : Variable
Bit rate : 126 Kbps
Channel(s) : 2 channels
Sampling rate : 44.1 KHz
Compression mode : Lossy
Stream size : 71.6 MiB (8%)
Language : English
Encoded date : UTC 2011-01-21 11:56:05
Tagged date : UTC 2011-01-21 12:21:37
We can also use a utility called GraphEdit to see how the video file is being rendered by the system and what decoders are being used?
Open Graph Edit and select Render Media File

Looking at the same .MOV movie file I can see that the LAV Decoder is being used for both Video and Audio.

More tools can be found here.
Note:- I think GraphEdit is 32 bit so its the settings in the Shark 007 32 bit Settings Application that are reflected.
Well I think I’ve covered all the basics now and hopefully you have found this guide helpful. Codec as you probably know is a bit of a black art at the best of times and there is no right and wrong way to get all your video files playing, its just a case of having a little knowledge and being able to choose a solution that works well for you.
The Shark 007 user forums can be found here there is a Wiki here and also please do not forget to DONATE to Shark 007 if you find his codec pack useful.
www.phaze1digital.com


